One of our servers, for some reason, has gone all black on the logon screen. It has been like that for a while. You can still login by typing in the login details "blind", but the logon screen is just completely black, whether via Remote Desktop or the console.
Today I finally decided to google for some info about it. Sure enough it's pretty simple to fix. It is caused by the registry for the default user's color scheme (under [HKEY_USERS\.DEFAULT\Control Panel\Colors]) being set to all zeros. And it can be fixed by setting the registry values to some proper values, for example, by exporting your own set of colors and importing them into the Default User.
Here is the Microsoft support article explaining it all: http://support.microsoft.com/kb/906510.
Friday 27 August 2010
Tuesday 22 June 2010
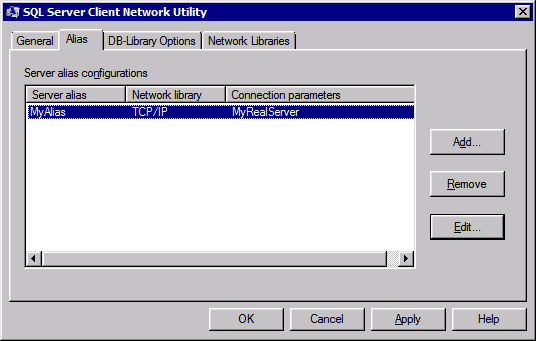
Using SQL Server Aliases
Recently we set up a SharePoint 2010 development environment at work. I was tasked with adding the SSRS 2008 R2 server to the farm and setting it up to run in integrated mode.
I followed the instruction in MSDN, firstly installing SharePoint then tried to join it to the farm. However, it kept giving an error when I hit apply on the config database. I digged around, and found in SharePoint it not using the actual server name of the config database. Instead, it is using a alias to specify the SQL server host name. It worked without problems after I create the same alias on the SSRS box and using it as the config database server.
You can create these aliases from SQL Server Configuration Manager. Or for machines that don't the SSCM installed, you can use "cliconfg.exe", or SQL Server Client Network Utility, instead (see screenshot below). This utility seems to be shipped with pretty much all current versions of Windows from XP/2003 onwards.
In the past I have been advocating the use of DNS entries instead of actual server names where the server could change. This has the advantage that if you need to move the database (or whatever function the machine serves) to another server, it's a simple matter of updating the DNS entry. In addition, this also allows you to provide a nice, easy to remember name if users will be accessing it directly.
Using SQL Server Aliases provides a similar facility that allows you to change the actual server with minimal change. The difference is that you may need to update the alias in multiple places. However, it is still a good option if, for some reason, it is not possible or not easy to make changes to the DNS.
Monday 14 June 2010
Why CurrentMember Can Be Used Only On Hierarchies
I used to wonder why the MDX function CurrentMember applies only to hierarchies and not to levels. For example, the Members function can be used on either a hierarchy or a level, and returns the appropriate set of members. I thought it would make sense if CurrentMember worked in a similar way.
Today while reading Chapter 10 - MDX Concepts of the book Microsoft SQL Server 2008 Analysis Services Unleashed, it suddenly hit me. I realised why CurrentMember should only be applied to hierarchies and not to levels.
The book was explaining the concept of Execution Context and how SSAS works out the current coordinates for a query. The SSAS engine starts by setting the current coordinates to the default member of each attribute hierarchy. In most cases this would be the All member. Then it takes the members that have been specified in the query and overwrites the appropriate attributes. However, the coordinates for those attributes not specified in the query will remain at their default member. Therefore in most cases, these attributes' CurrentMember is still the All member.
So that's why the CurrentMember function can be applied only to hierarchies and not to a specific level: because it needs to be able to return any member from the whole hierarchy, including the All member. Applying the function to a specific level could return invalid results.
Rethinking about this, it all seems be a bit obvious now, but I guess it never clicked for me before. So I am happy to share it in case you have wondered about the same thing.
Sunday 4 April 2010
Windows 7's Boot from VHD - Transferring the VHD to a New Hard Drive
You might be aware that Windows 7 and Windows Server 2008 R2 are capable of booting from a VHD. The advantages of this set up include ease of backing up the whole O/S partition and the ability to dual-boot (or multi-boot) without the need to create multiple partitions.
If you search for terms such as "Windows 7 boot VHD", you will get lots of hits on how to install a new instance of the O/S using this feature. But what if you have already set up such a booting arrangement, and now wants to move the VHD from one drive to another? For example if you have bought a new faster hard drive and want to transfer over the VHD. I haven't found any post describing how to do this.
One way to do this would be to run through the O/S install process again on the new hard drive, creating a brand new VHD boot. Then just copy your existing VHD onto the new hard drive, overwriting the new VHD you just created. However, this meant going through the whole install process again, and I wanted to find if there is a faster way to do this. After some experiments and some searches on the web, the following steps worked for me (assuming you have connected up the new hard drive, created a primary partition and formatted it):
Some additional notes:
If you search for terms such as "Windows 7 boot VHD", you will get lots of hits on how to install a new instance of the O/S using this feature. But what if you have already set up such a booting arrangement, and now wants to move the VHD from one drive to another? For example if you have bought a new faster hard drive and want to transfer over the VHD. I haven't found any post describing how to do this.
One way to do this would be to run through the O/S install process again on the new hard drive, creating a brand new VHD boot. Then just copy your existing VHD onto the new hard drive, overwriting the new VHD you just created. However, this meant going through the whole install process again, and I wanted to find if there is a faster way to do this. After some experiments and some searches on the web, the following steps worked for me (assuming you have connected up the new hard drive, created a primary partition and formatted it):
- Boot up your machine in Windows 7 install DVD.
- Press shift-F10 to bring up the command prompt.
- Copy the VHD to the new hard drive. (You could do this beforehand if you have another O/S you could boot up in, so that the VHD could be copied.)
- Power down and disconnect your old hard drive. This step is optional, but it avoid any confusion between new and old drives. Then repeat steps 1 and 2 to get back to the command prompt.
- Run diskpart, then enter these commands (where C:\Win7.vhd is the location of your VHD on the new hard drive):
- select vdisk file=C:\Win7.vhd
- attach vdisk
- exit
- From the command prompt, enter:
- bootsect /nt60 C: /mbr
- From the command prompt, enter (where E: is the drive letter of the attached VHD):
- bcdboot E:\Windows /s C:
- Exist the command prompt
- Go back and follow the main Windows 7 install screens. On the 2nd screen, click the "Repair your computer" link.
- On System Recovery Options screen, choose "Use recovery tools" then click Next.
- Choose the "Startup Repair" option.
- After it has done its work, click the Finish button. It will reboot.
Some additional notes:
- Instead of pressing shift-F10 (or if you don't remember which keys to press), you can also go through the "Repair your computer" option (steps 9-10) to get to the option to bring up the command prompt.
- These steps assumes you have formatted your new hard drive while running in Windows. That would be easier and safer. If you consider yourself hardcore, you can do the formatting from within diskpart in step 5. But be very careful, because if you select the wrong disk, you would wipe out your existing hard drive.
- If you are running on a physical partition, you can convert it to booting from VHD. Firstly, use Disk2vhd to copy your existing partition to a VHD. Then follow the steps similar to above to set up booting from the VHD.
Subscribe to:
Posts (Atom)